
How to use Azure Key Vault in ASP.NET Core apps

Software engineer with 4+ years of experience in Web Application development with a Master's in Cloud Computing.
Azure Key Vault – what is it?
Azure Key Vault is a tool for securely storing and accessing secrets. A secret is anything that you want to tightly control access to, such as API keys, passwords, or certificates. A vault is a logical group of secrets. Essentially, Azure Key Vault can be thought of as well, a vault! You put your secret things in, and they are kept secure by the vault. Azure Key Vault is of course more complex and offers many features. Feel free to dig more into the details in case you are interested.
Motivation
The aim here is to configure the data protection system in such a way as to store its keys outside the app server, but also to do so in a secure way. The data security keys can be stored in a local folder by default (see default settings), and the keys may or may not be encrypted at rest. Azure Key Vault, in combination with managed identities for Azure resources enables your Azure web app to access secret configuration values easily and securely without needing to store any secrets in your source control or configuration.
Prerequisite
• Azure portal access
• Visual studio or visual studio code
We need an Azure App Registration in the Azure Active Directory together with Azure Key Vault to access key vault secrets.
Using Azure Key Vault with ASP.NET Core apps
To use Azure Key Vault as one of the configuration providers for your app you'd need to do some work, such as adding specific NuGet packages, getting the Vault URL, creating your clientId and secret, connecting to the vault, reading the secrets.
Steps of our demo
- Creating the key vault.
- Adding a database connection string to our key vault.
- Configuring the access policy on the Key Vault for our App Service.
- Creating a system-assigned identity for our App Service.
- Creating ASP.NET Core 3.1 web application in visual studio and configuring the key vault.
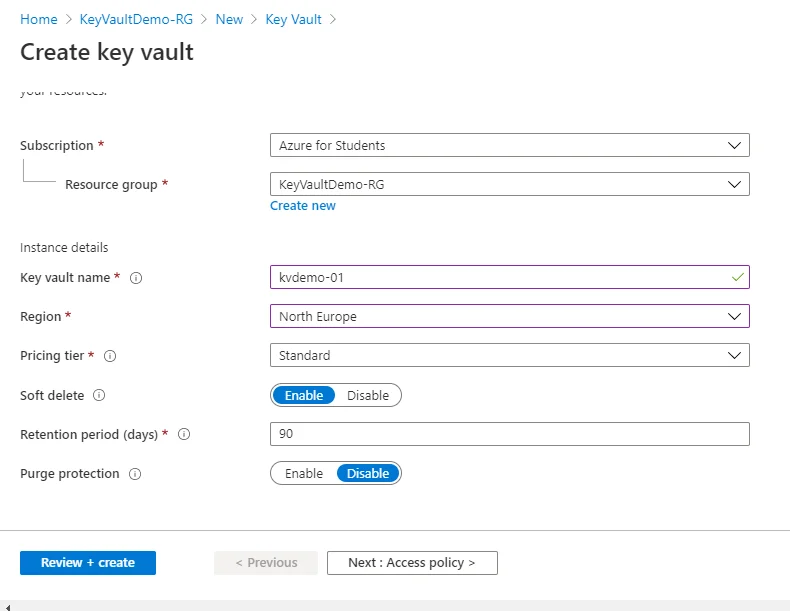
Creating the Key Vault
On the Azure Portal, go to Resource groups >>
- Fill in the Instance details: Name, Region, and Pricing tier.
- Review the things and click on create. We will talk about Access Policy later in this post.
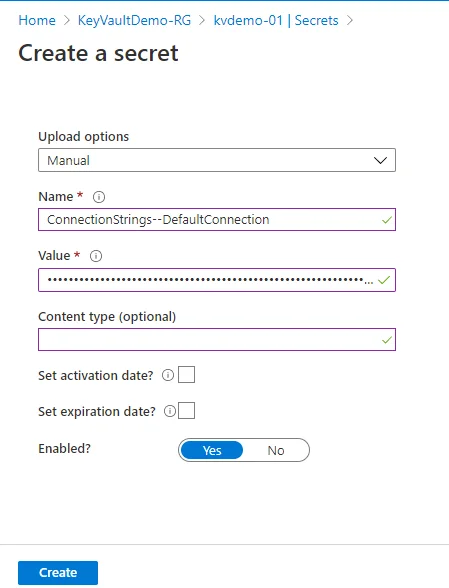
Adding a database connection string to our Key Vault
Navigate to your Key Vault once deployment finishes. Look at the left menu and click Secrets and then Generate/Import

Enter the connection string to your database and click Create. I have added my connection string and the page looks like this:
Configuring the access policy on the Key Vault for our App Service
We need to grant permission to our web app to read the secrets from the Key Vault. To do this go to Key Vault Page, and from the left menu click on Access Policies.
Once on the Access policies page, click on Add access policy. Select Get for the Secret permissions field. Next, click on the Select principal field. A sidebar will appear on the right side of the screen. There, you need to search for our managed identity, which matches the name of your App Service. Click Select on the window. In the end, it should look like this:
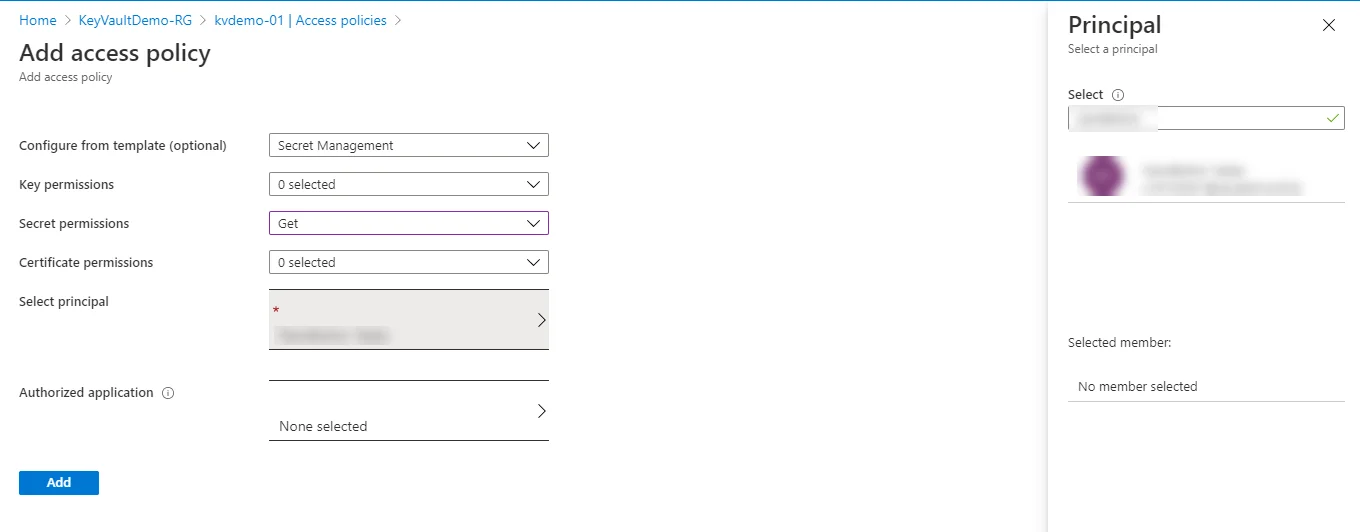
Click on Add then on Save to save changes. Now our app service has Get access to secret in the Vault.
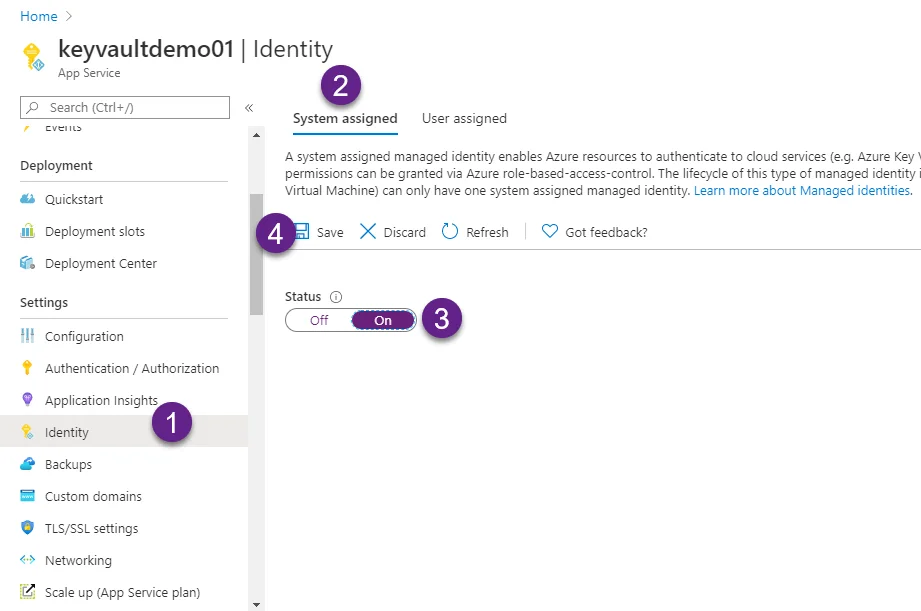
Creating a system-assigned identity for our App Service.
Our App Service needs to have access to it to be able to consume the secrets from the Key Vault. In Azure, you can configure one resource to access another by creating what’s called a managed identity. Once your resource has a managed identity, you can modify another resource and allow access to it.
Creating ASP.NET Core 3.1 web application in visual studio and configuring the key vault
After creating the project, install Microsoft.Extensions.Configuration.AzureKeyVault NuGet package to the project.
Now, let’s modify the CreateHostBuilder method in the Program.cs file.
using System;
using System.Collections.Generic;
using System.Linq;
using System.Threading.Tasks;
using Microsoft.AspNetCore.Hosting;
using Microsoft.Azure.KeyVault;
using Microsoft.Azure.Services.AppAuthentication;
using Microsoft.Extensions.Configuration;
using Microsoft.Extensions.Configuration.AzureKeyVault;
using Microsoft.Extensions.Hosting;
using Microsoft.Extensions.Logging;


namespace AzureKeyVaultDemo
{
    public class Program
    {
        public static void Main(string[] args)
        {
            CreateHostBuilder(args).Build().Run();
        }


        public static IHostBuilder CreateHostBuilder(string[] args) =>
            Host.CreateDefaultBuilder(args)


            .ConfigureAppConfiguration((context, config) =>
            {
                var keyVaultEndpoint = GetKeyVaultEndpoint();
                if (!string.IsNullOrEmpty(keyVaultEndpoint))
                {
                    var azureServiceTokenProvider = new AzureServiceTokenProvider();
                    var keyVaultClient = new KeyVaultClient(
                        new KeyVaultClient.AuthenticationCallback(
                            azureServiceTokenProvider.KeyVaultTokenCallback));
                    config.AddAzureKeyVault(keyVaultEndpoint, keyVaultClient, new DefaultKeyVaultSecretManager());
                }
            })


            .ConfigureWebHostDefaults(webBuilder =>
            {
                webBuilder.UseStartup<Startup>();
            });
        private static string GetKeyVaultEndpoint() => "https://kvdemo-01.vault.azure.net/"; //Endpoint of the Azure Key Vault.
    }
}
Now we can access the value in our controller like this.
public class HomeController : Controller
    {
        private readonly ILogger<HomeController> _logger;
        private readonly IConfiguration _configuration;

        public HomeController(ILogger<HomeController> logger, IConfiguration  configuration)
        {
            _logger = logger;
            _configuration = configuration;
        }

        public IActionResult Index()
        {
            TempData["mysecrets"] = _configuration["mysecret01"];
            return View();
        }

        public IActionResult Privacy()
        {
            return View();
        }

        [ResponseCache(Duration = 0, Location = ResponseCacheLocation.None, NoStore = true)]
        public IActionResult Error()
        {
            return View(new ErrorViewModel { RequestId = Activity.Current?.Id ?? HttpContext.TraceIdentifier });
        }
    }
The sample project can be found on my GitHub repository.


